
Collections Illustrated
Sample Collection
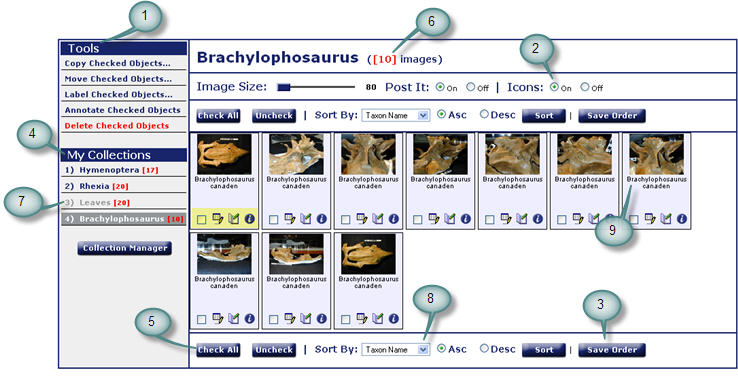
Tag descriptions
- Tools:
 To use Tools, images in the collection need to be
tagged by using the check box in the lower left hand
corner of each image as shown.
When the image is selected, its screen is highlighted so selected images are visible
at a glance.
To use Tools, images in the collection need to be
tagged by using the check box in the lower left hand
corner of each image as shown.
When the image is selected, its screen is highlighted so selected images are visible
at a glance.- Note Well, many of the Tools work only for Collections of Images. If a collection is created from mixed objects (Images, Specimens, Views, Publications, etc...) some of the Tools do not function as they are not meaningful anymore.
- Copy or move checked objects: Users have the option of copying or moving objects to a new collection or to another owned, unpublished collection. Check the images to include, then select the desired option from the dropdown list.
- Label checked objects: Users have the option of labeling the checked images by taxon name, specimen id, specimen part or view angle. Select the desired label criteria from the dropdown list.
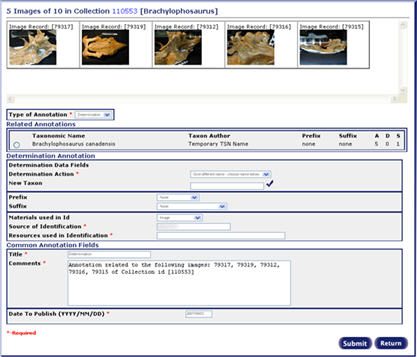
- Annotate checked objects: Users can annotate an image (single annotation) or an entire collection of images at one time (mass annotation). Complete instructions for this process can be found in Add Annotations located in the Annotations chapter of this manual.
- Delete checked objects: Users can permanently delete any of the checked images from an unpublished collection by selecting this option (checking all of the images in the collection deletes the entire collection). A confirmation message will appear prior to completing the delete.
- Collection display settings:
- Collection images display size: The default, most manageable image size is small due to load speed and space requirements. Use the slider bar to increase the image display size (May take longer to load). The aspect ratio is retained for all choices.
- Post It: Hovering over an image in a collection will display a post it note containing additional information. This feature can be turned off by selecting the appropriate radio button.
- Icons: Each image in a collection contains a row of icons (selection box,
edit, annotate, information) that may be turned on or off as needed.

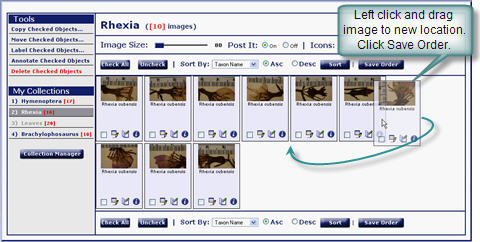
- Save the order:
The order of the images in the collection can be changed manually. Drag
and drop the image(s) into the new location. Retaining the
new order requires selecting the Save Order button. If this is not done,
the order will revert back to the previous state when exiting out of the
collection.
- Collection list: Offers the user a list of all the collections that have been created under the current username and group. The current collection that is being displayed is highlighted dark grey. The collections which are light grey are published collections. The red number in brackets corresponds to the number of images in the collection. Clicking on a collection will display the collection contents and saved order. To access other collections under the same username but created under another authorized group, return to the Select Group screen and login under that group. There is no limit on the number of collections a user may have.
- Check buttons: These buttons are used to check or uncheck an entire collection of images or objects.
- Number of images: This number reflects the current number of images/objects in the collection.
- Published collection: Published collections show up as grayed items on the collection list. They can be viewed, copied to another collection or annotated but not altered in any other way.
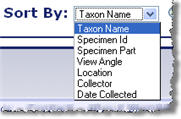 Sort:
The sort option enables the user to
organize their collection in a more
desirable order. Select the sort criteria
from the dropdown box and click on the
sort button. This will save your
collection in the sorted order. Sort works for images (not mixed collections).
Sort:
The sort option enables the user to
organize their collection in a more
desirable order. Select the sort criteria
from the dropdown box and click on the
sort button. This will save your
collection in the sorted order. Sort works for images (not mixed collections).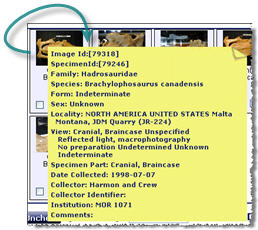 Images:
The image tiles contain the image and
options for annotating the image,
editing the title of the image or
displaying the single show feature
for the image. In addition, clicking on
the image will bring up the FSI Viewer
and hovering the mouse pointer over
the image tile will display an
informative Post it note pertaining to
that image.
Images:
The image tiles contain the image and
options for annotating the image,
editing the title of the image or
displaying the single show feature
for the image. In addition, clicking on
the image will bring up the FSI Viewer
and hovering the mouse pointer over
the image tile will display an
informative Post it note pertaining to
that image.
Next |
Contents
|