
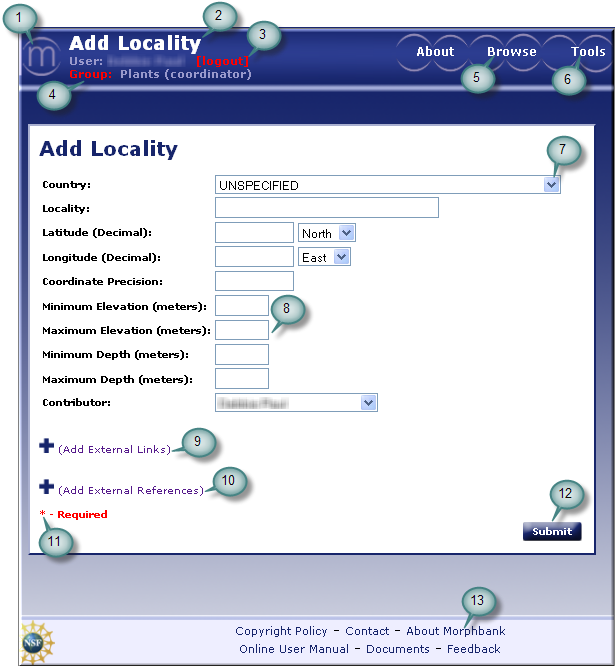
Anatomy of Morphbank Pages
Tag descriptions
- Click on logo to return to the Morphbank home page at any time.
- Page Name.
- Click to logout. (Only visible after login).
- Username and Morphbank Group the user logged-in with (Only visible after login). Hover over Group to see all Morphbank Groups of which one is a member. Use the Group drop-down to choose a different group.
- Hover over Browse to reveal a selectable drop-down list that will advance/return the user to other areas within Morphbank.
- Hover over Tools to reveal a selectable drop-down list that will advance/return the user to other areas within Morphbank including: Account Settings, Group Settings and the Submit Locality, View, Specimen, Publication, Taxon Name and Image screens.
- Select to reveal drop-down list.
- Entry boxes for user to input appropriate data.
- Click to open Add External Links. Any user may add External Links to their Morphbank Objects. For example, a user may link to GenBank or a published journal article.
- Click to open Add External References. For the user with an existing database or who might be referencing an object in an existing database, this section allows a Morphbank User to provide Morphbank with an existing unique identifier for this object. Examples here include Taxonomic Id numbers from Taxonomic name servers like Tropicos, IPNI, UBio or Catalogue of Life, or perhaps doi numbers for publications.
- No fields in Add Locality are required. Any required field is marked with a red "*"
- Click on buttons to perform various tasks in Morphbank (see "Guide to Graphic Buttons"section in this manual).
- Redirect to the corresponding area within Morphbank.
- Any user in a Morphbank group may submit images on behalf of other members in the same Morphbank group. Choose the person to be the Morphbank Contributor of the record. The person currently logged in is automatically the Morphbank Submitter. Any member of this Morphbank group may edit the record as needed.
The Morphbank My Manager interface is modular. Use the header menu options Browse and Tools to access My Manager. Features found in one My Manager tab work the same way in each tab. This screen shot serves as a general introduction to this user-interface.
The number of hits displayed on each page can be designated (A) and a user can advance to a specific page number by listing that page (B) and selecting the go button. Keep in mind that the quantity of information requested to display per page will affect the speed at which that screen loads (i.e. requesting 100 records per page will take longer to load than the screen that has only 10 records to load).(C) Help and Feedback are available from any tab in Morphbank. The Help link is contextual to where the user is when they click on Help. Feedback opens a form the user may fill out to send an automated message to Morphbank.
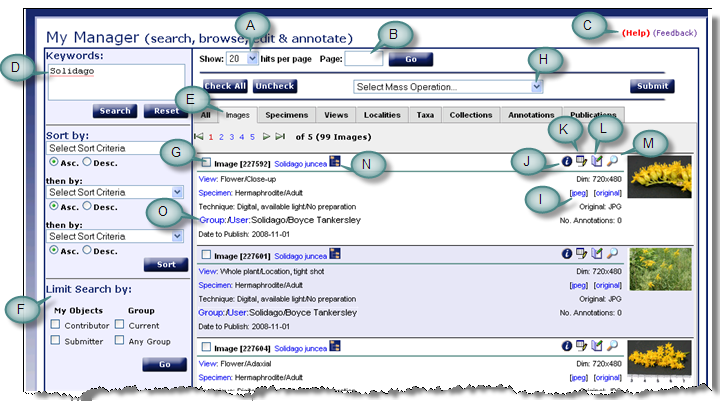
At the top left is the Keywords search box (D). Metadata associated with each object in Morphbank is stored in a single table for quick searching. Any string entered here is wild-carded. Searches here are boolean and so that the user may narrow the result set. Click on the Search button, or press enter to perform the search. Use the tabs (E) to jump to different Morphbank objects (Images is the tab shown here). At the left side-bar, note the Limit Search by feature (F). By checking one of the boxes, the Morphbank user can limit the resulting objects on display as desired. For example, the user may only wish to see objects they have contributed to Morphbank. Then, by using the check box (G) or the Check All button, the Morphbank user can group this set of objects into a Morphbank collection. First the user checks the objects to be collected and then goes to (H) Select Mass Operation. From the Select Mass Operation drop-down, the user chooses Create New Collection and then clicks on the Submit button.
Clicking on the jpeg or Original (I) links will open images uploaded to Morphbank. If the original images have other formats, those will be found here. Selecting the information icon (J) will display detailed information about that object. Other options such as edit (K) and annotate (L) will be available only for those authorized through login permissions. The magnifying glass (M) will open the image using the open source zooming image viewer, allowing the user to move the image and zoom in / out; labeling is a function that may be available soon. The zooming image viewer is used to display high-resolution imagery on Morphbank. This viewer, known as Bischen, is a component of CollectiveAccess, community-developed open-source collections management and presentation software for museums, archives and arts organizations. For more information, visit http://www.collectiveaccess.org Selecting the tree of life symbol (N) will list the taxonomic hierarchy of the Taxon name. (O) indicates a unique feature of the My Manager > Images Tab. For example, clicking on the "Group" link for a given image, will perform a search for all images associated with that Group. Clicking on "User" will return images for that Morphbank User/Contributor, etc.
Next |
Contents |